This is a continuation of the previous article where I discussed the parts of the homemade adjustable safety squat rack and their functions. In this article, I'll discuss how each of the parts of the squat rack are constructed and assembled.
Here is the pair of the homemade safety squat racks as seen from the front. It has been adjusted (raised) to a height suitable for me to perform the squat exercise.

Materials used for the Construction of the Squat Racks
Caution:
The actual measurements are included in the procedures, but remember, these measurements may vary to suit your body dimensions and/or preferences.
Listed below are the materials used in the construction. Only the general specifications will be mentioned.
Other than the metal parts that can be bought from big hardware stores or construction supply shops, the rest of the materials used can be sourced from discarded items or scrap.
- Angle bar - 1 1/2" width (one side) and 1/8" thick
- Steel Square Tube - 1 1/4" x 1 1/4"
- Steel Square Tube - 1 1/2" x 1 1/2"
- Machine Bolts - 1/4" thick, varying lengths, longest is 2 1/4". Instead of welding, all metal components are joined together with bolts.
- Washers - for 1/4" thick machine bolts
- Steel Pipe - 1" Diameter
- Nail - 4" to 6" Long
- Rubber Garden Hose - 5/8" Diameter
- Rubber Tire Interior Tube (from old bicycle tires)
- Rubber or Foam Tiles
- Construction Adhesive
- Duct Tape
Tools Needed
- Power Drill
- Drill Bit - 1/4"
- Hack saw for cutting steel
- Heavy duty scissors for cutting rubber
- Vise Grips
- Pliers or Open Wrench
Procedures to Construct and Assemble the Squat Racks by Part
In lieu of welding, metal connectors are used to bolt metal components together. These are simply short pieces of the angle bar cut to 1 1/4" wide.
Listed below are the procedures to construct and assemble the parts of the squat racks. Use the photo below to identify the labeled part's number.
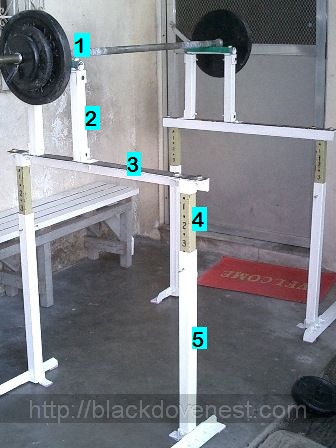
1 - Barbell Catch, 2 - Barbell Supports, 3 - Safety Bar, 4 - Metal Tubings, 5 - Posts
Barbell Catch

- Saw a 1" diameter steel pipe to a length of 9".
- Drill 1/4" holes at both ends of the steel pipe. Ensure 2 holes are drilled at each end, one on top the other at the bottom for the machine bolt to pass through the pipe's diameter.
- Cut a 5/8" diameter rubber garden hose (shown colored green above) to a length of 9" and cut it in half lengthwise.
- Punch or cut 1/4" holes at both ends of the rubber garden hose to match the 2 top holes drilled on the steel pipe.
- Apply construction adhesive on the underside of the rubber garden hose and wrap the hose on the steel pipe.
- Secure both ends of the rubber garden hose with duct tape.
- Use bolts to attach 2 connectors at the bottom of the steel pipe.
Note: These barbell catches can double up as dipping bars if these racks are set up as a homemade dip station.
Barbell Supports

- Saw 2 pieces of 1 1/4" steel square tube to a length of 10 1/2".
- Drill 2 pairs of holes at the top and at the bottom of the steel square tubes.
- Join the top ends of the steel square tubes to the connectors of the Barbell Catch.
- Use bolts to attach 2 connectors at the bottom of the 2 steel square tubes as shown above.
Safety Bars

- Saw the angle bar to a length of 30".
- Drill 5 holes on the top side of the angle bar as shown above. Two pairs of these holes attach to the connectors to the 2 metal tubings and one hole for one of the barbell supports.
- Cut the rubber tire interior tube to a length of 30" and width of 1 1/2" (colored black above).
- Punch or cut holes on the rubber tire interior tube piece to match those holes on the angle bar.
- Apply construction adhesive on the underside of the rubber and secure it on top of the angle bar piece.
- Join the top side of the angle bar to the connectors of the Barbell Supports.
The photo below is the other squat rack's safety bar showing the inside of the angle bar.
Rack Tubings

- Saw 2 pieces of the 1 1/4" steel square tubes to a length of 24" (colored olive green above).
- Drill holes along the length spaced 2" apart. These will be the holes for setting the desired height of the rack.
- Drill holes at one end that are perpendicular to the previous drilled holes. These holes will be used to join the angle bar.
- Join each metal tubing to the angle bar with a pair of connectors as shown above.
Posts

- Saw 2 pieces of the 1 1/2" steel square tubes to a length of 24".
- Drill a pair of holes near the top of the tubes. This is for setting the desired height of the squat rack with a pin.
- Drill 2 pairs of holes near the bottom of the tubes. One pair is perpendicular to each other.
- Saw a piece of the angle bar to a length of 15". This will be the long foot or stabilizer of the post.
- Drill 3 holes on the angle bar.
- Attach a spare connector on the other side of the steel square tube. This will be the short foot of the post.
- Join the angle bar to the 1 1/2" steel square tube as shown below in the photo below.
- Cut small pieces of the foam tiles to line the underside of the feet of the post.
- Use construction adhesive to secure the foam tile pieces (partially hidden, and colored light purple below).


(See Part 5 for the continuation of this article)


Go ahead, post your comment below!
These are great instructions and ideas. I thought you deserved a pat on the back and at least one comment.
Thanx!